
Updated 03/05/2011 & 03/06/2011
This is strictly my own personal opinion about the matter. All material uncovered was done through a public google internet search with a few different keyword entries.
Due to information uncovered and revealed about this company, I cannot in good conscience or good faith recommend anyone support this reportedly handmade, organic small business. If information had been disclosed prior to discovery by the shop owner herself, I would have no problem with continuing to purchase. Regretfully, the scope of the lie and how many different people it could have potentially affected and hurt leaves me no other choice than to say this is not an honest company to do business with.
For information as to why, you can read more below:
http://the-eyes-have-it-all.blogspot.com/2011/03/this-way-that-way-which-way-whats-going.html
http://the-eyes-have-it-all.blogspot.com/2011/03/long-tale-of-orglamix-organic-ending.html
Or click here for more links and topics. The information can be found just below the introduction paragraph on the page.
**********************************************************
Ok, so I promised you a blog tonight, and I know it's a little past midnight... So technically tomorrow. But I'll stop blabbering now, and get down to business!
I'm not a huge Taylor Swift fan, but I do find her pretty in some of her videos, and I do like some of her music. So, I've picked out a few I'm going to re-create. This is "Numbah One"!
She's so delicate, yet not-quite-innocent in her video "Our Song". I have a soft spot in my heart for country songs that has lyrics like "Our song is the slammin screen door..." ect. But enough jibber jabber.
First- we need ingredients.
Today, for this look, I used my Orglamix Collection.... Oh what fun it was!
Three colors are all I used for this look. It honestly didn't need much at all.
Sesame, Brimstone, and Vanilla Birthday Cake were the three choices- as the Sesame is a gorgeous shimmery silver, Brimstone for dimension, and VBC to highlight and add sparkle.

First, you want to use primer on your eyes. The cute lil' Skully primer I did get from my other favorite makeup supplier, Moi Minerals Cosmetics . Why put on primer? I'll tell you, and it will be your best friend!!! Applying primer before you swipe on some color of eye shadow ensures that you'll get long lasting, vibrant, crease-free color for the duration of your wear. Don't believe me?? I'll do another post sometime this week that will show you that I can put makeup on in the morning, and have it look just as good in the evening! Even after a swim!

Ok so now that we have the primer set and applied to your entire eye, and a swipe on your lower lid- open your silvery color. Using the "Touch Up" brush, I applied the color to my upper lid, extending it a little outside the crease of both my eyes. You want to make sure you "pat" the color on- silvers can be difficult and quickly end up being a dull gray from too much blending.


I used the "Touch Up" brush as my eyeshadow applicator- I just love the contour of the brush, and it always puts on just enough color. You can layer the silver shadow for a darker look, but I wanted to keep this easy and quick.
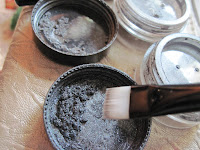

Next up is Brimstone. It's a silvery black, a nice complement and a great color to add dimension to the silver shadow. Using the precision brush, I applied the color to the outside corner of my eyes, and swept the color into my crease. Blending the color is fabulous using the precision brush. Swipe on a little on your bottom lid.

Out comes the Vanilla Birthday Cake. It's a delightfully sparkly white color that's perfect for toning down colors so they're not so vibrant... And also wonderful as a highlighter. Using the "Touch Up" brush again, swipe the color along your browbone.

Next, pat a little over the colors already applied to your lids. This will bring the color down and make it not as harsh. You also want to remember to pick up the white and dust it over the silver on your bottom lid, and then again below the silvery color. We want to be very sparkly here! Don't worry- we can add more if we need it...

Using the concealer brush, cover up any spots or places that need a little extra coverage. For me, especially lately, I have awful bags under my eyes. Taking the foundation and patting a little over the blue black circles does wonders for covering it up.... See?!


In the photos above, you can see how I've applied the foundation to my right eye. In the second photo, you can see the difference in skin tone between my left and right eye. Go away ugly eye bags!!!

Next, we want to apply foundation to the face. Remember from the Essentials Post yesterday that it's important to have a Kabuki brush for application of foundation. It blends it juuuuust right. So pick up a little foundation at a time, and in small circular motions blend the it into your face. Don't worry- the color will self-adjust to your skin tone and look wonderful!

Next we want to fill in brows. For me, I have to do this. I'm a natural blonde (shhh! don't tell anyone!!) and my brows tend to come in lighter than I'd like them to. So in order to get them to cooperate, I need a little assistance from brow powder.

With the correct brush, the angles come out perfectly! You want to make sure you don't pick up too much powder- you don't want to over-do it! You could end up looking like "bushy-brow"... But if that's the look you're going for... Have fun!!

Next... Eyeliner. I love eyeliner. I think I over did this a little, and ended up with a different video look than Taylor had... But it's ok. It's all about interpretation, right?! So I lined one eye, and left the other with just the shadow to show you how much to put on.


You don't want a super-thin line, but you don't want a really thick one either. Sharpen your pencil before you apply the liner- this will give you more "play" with the application. Once your eyes are lined, take a bow! You've done great so far!
It's here that I picked up a little more of the VBC shadow, because I didn't think I was "sparkly" enough... So I patted some more on the gray area above the crease of both eyes, and then to the inner corner and blended outwards. Also remember to apply some more to underneath your eye- your black eyeliner just covered some of it up and we want to sparkle and soften the look!

So far, we've got the eyes almost done... And face has been taken care of. Now it's time for blush... I have just a plain brush I use to sweep some color on. You typically want to stick with peaches and neutral tones- unless you really want shimmery or red cheeks. No, I haven't done a doll look yet... Meh. Well- take a brush- and lightly sweep the color from the top of your cheekbone downwards to your cheek. This will deposit the color in a most flattering way, and looks natural too!


Now, pick up your angled eyeliner brush and the Brimstone eye shadow. Using the brush dry, dip it into the color and lightly apply the color to the black eyeliner you've already put on. That's right- shimmery black right on over the harsh black eyeliner! You can smush, smudge and soften the lines on your upper and lower lid if you like... I did a little bit. Again- don't be afraid to use the brush or the color.

And one of my favorite things to do... Apply mascara! Actually, it's only fun if I manage to not stab myself in the eye with the wand... But, today was a good day. It didn't stab me! Since I have super-long lashes (I know, I know, you hate me...) I only had to do 3x coats of mascara to get the same look Taylor had with fakies. You didn't actually believe those lashes were her own, did you!


The look is complete! How's that for a picture-does-it tutorial?! Bat those lashes, give sexy sultry looks- darlin, you're worth it! And all this work on your eyes is nothing short of fabulous!!!


No comments:
Post a Comment