Showing posts with label N.Y.C.. Show all posts

April 30, 2011

Konadicure - Hello Kitty, You're Lookin Wild Today!

Ah yes. Since we all know, or at least have a pretty good idea by now, just how much of a geek I am... This is a perfectly acceptable manicure for me to sport. I'm a tomboy at heart- I work on tractors, cars, and trucks. I can do my own oil changes, know how to replace my brake pads- and put it all back together. I've replaced a broken head block, bored out stuck screws, and know how to clean spark plugs. It's quite easy. I know where my fusebox is, how to replace a blown one, how to back up with a trailer attached to my vehicle and not jack-knife it, and how to squeeeeeeeeze my Truckasaurus Rex into areas where people in VW Bugs think is impossible for them to travel. I'm proficient on how to get a fire out side going, how to split wood, plowing a driveway with a tractor (if there's ever a time I have one of my own, I know how to operate it. To hell with a snowblower!), lay real pine flooring, assist with tiling work and an array of other stuff. I'm familiar with nearly all of Dad's tools, in the tool box and the "Big Boy Toys". Told you I'm a tomboy.


I'm also excellent at applying makeup, and love to do my nails.
I hate the word "cute". I don't know, I say it some times... But don't ever call me cute. It's a guaranteed butt whoopin for you if you dare to go there. And be aware- at this time, I wield a cane, so I have the added assistance of a "weapon", if you can even call it that.

 
Anyways- look at what I'm excited to show you! I did my nails in a totally awesome mani today. I rewarded myself- it was laundry day, I cleaned, vacuumed, and did litter boxes (since we have a lot of cats). I figured, what the heck. I've had my nails bare for a few days now, and I was positively dying to use my Hello Kitty stamping plate that I got from Born Pretty Online's Store. Yep, they had a promo for a while where if you Re-Tweeted their Tweet, you'd get a free HK plate. So guess what I did. Yes, indeed.


I didn't, however, want to go all out and put that darling little cat on each nail of mine- I thought it would be kawaii overkill. I suppose I could have gotten away with it, but I love how this turned out! Don't you agree??

On my nails:

Orly Rubberized Basecoat
Sinful Colors "Forget Now"
Sally Hansen's Insta-Dry polish in "02 Whirlwind White"
N.Y.C. Long Wearing Nail Enamel in 104A
Seche Vite Fast-Dry Topcoat
Konad's Special Polish in Black-Gold
Konad Plate M57
Born Pretty Plate in M71
Very Small Swarovski Crystals (If I had to guess, about 2mm)

Basically, what I did was brush on the Orly Bonder. Then, on all fingers except my "accent", or ring finger, I applied SC's "Forget Now" polish. I like this one because it's a beautiful deep magenta with silver sparks in the polish. When in sunlight, it's absolutely gorgeous! Once they were done with 2 coats, I finished them off with a coat of Seche Vite.


Next, I painted my accent nails with Sally Hansen's "02 Whirlwind White" for my base. I did 2 coats, and finished with a coat of SV. I then took Konad's M57 plate and stamped the lacy leopard print pattern onto the tips of my nails using their Special Polish in Black-Gold. By this time, my accent nails were dry enough to stamp, so I put on the lovely Miss Hello Kitty and covered all my nails with a SV clear coat.

I used SC's "Forget Now" again to color in the little bow on her head, and applied the N.Y.C. 104A to my nail around Hello Kitty's face. I did two coats, because I wanted the pale blue shimmery shade to really be set off in sunlight and show that there really is another color besides white on my nails. One that was done, I put a dab of SV in the middle of the bow, picked up a rhinestone, and placed it. Another (bit thicker) coat of SV was applied- and I was done!

Now, in some of the pictures it appears that Hello Kitty is smeared and has an air bubble. Upon closer inspection, I didn't smear her face (my camera somehow picked that up!), and the air bubble has since gone to Vegas.


I'm totally feeling like a sassy cat right now! Is it a manicure you'd be proud to sport??? What do you think?!

I'm feeling pretty girlie right now... And that's ok with the tomboy part! *laughs*

Sparklies and Hello Kitties to all!

x0x0x0 ~*Snarky P

September 18, 2010

Get the Look - Wild Leopard Spots!

Updated 03/05/2011 & 03/06/2011


This is strictly my own personal opinion about the matter. All material uncovered was done through a public google internet search with a few different keyword entries.

Due to information uncovered and revealed about this company, I cannot in good conscience or good faith recommend anyone support this reportedly handmade, organic small business. If information had been disclosed prior to discovery by the shop owner herself, I would have no problem with continuing to purchase. Regretfully, the scope of the lie and how many different people it could have potentially affected and hurt leaves me no other choice than to say this is not an honest company to do business with.

For information as to why, you can read more below:


http://the-eyes-have-it-all.blogspot.com/2011/03/this-way-that-way-which-way-whats-going.html
http://the-eyes-have-it-all.blogspot.com/2011/03/long-tale-of-orglamix-organic-ending.html


Or click here for more links and topics. The information can be found just below the introduction paragraph on the page.

**********************************************************

Yes, two tutorials done and uploaded within a 24 hour period?!


Yikes! It can be done!!!
So- here it is!


This look was made utilizing 100% mineral eye shadows from Orglamix Cosmetics and it's guaranteed to get plenty of comments and attention! True story: I went out for a little while with one of my best gal pals for her Birthday... And even though I wasn't out very long, I had done the tutorial for this prior to going out... And I said "What the heck. It's on, it looks rad, I'm wearing it tonight."


I had so many people come up and not only compliment my abilities on how to apply makeup so awesomely, but also was asked how much the "tattoos" on my eyes hurt getting done. *Q Laughter- I did!* I couldn't help it. Seriously?! You can't see all the sparkle and glitter on there?!?! Well, either which way.... Rock on!


The original tutorial came out grainy and dark... So this is my first video filmed in my "studio".... aka my bedroom with a new lighting setup. I know, fancy-schmancy right?! I thought for sure this video filmed with a blue hue- which I saw in the reflection of my BIG mirror in front of me- so imagine how delighted I was to come down here and see it filmed true to the actual colors!!! YESSSSS!


So ultimately, I think this look goes down in history as just plain kick ass! Perfect to wear out for a club night, party, or Halloween! All the cosmetics with the exception of Absinthe were purchased by me- I was lucky and won a blog contest and was able to pick the green fairy as one of three colors to choose.

Face: Physicians Formula: Organics Mineral Foundation
Eyes: N.Y.C. duo eyeliner, using black.
Eyes: Wet 'N Wild MegaLength mascara in black.
Leopard Spot Outline: Maybelline's UltraLiner in black.
Glitter: Hard Candy duo glitter/primer in Amethyst.
Lips: Revlon ColorStay in Top Tomato.
Gloss: Burt's Bees in Rhubarb.

Taaaa-daaaaa!!!!!


Get The Look - Caramel-Candy Apple Time!

In a few weeks, I'll actually be able to get one... But for now, I'll settle with this hot eye look ;)


I put a question out there to my Facebookers, and it was up to them to vote what my next eye look was going to be. Not realizing I had already done the Candy Corn Eyes as a surprise look to be revealed, I took the second and third place Candy Winners and created a look so far with one.


Both Candy Apple and Skittles were tied, so... I'll do both. Thusfar, I've done my rendition of Caramel Candy Apple eyes.... Which turned out quite glam, and definitely a look I myself will be re-creating both ways come the cooler weather. (The Skittles look is coming up shortly!) Since Candy Apples are a bright red- I really couldn't see outlining my eyes with red- which would have made me look sick- and applying only another color to highlight, like the inside of an apple. Well, no thanks. I needed more than that. And after reading a comment from a voter about possibly doing a "Candy Apple with Nuts" eye... Well, I thought that if I even so much as dared to try interpreting something like that- I'd be having people asking me what sort of weird eye affliction I have. LOL


I settled on using two warm toned metallic brown shadows which complimented the bright red perfectly. A soft pinkish highlighter blends in wonderfully, and isn't quite as bright as a white shadow would be... So I'd say these shadows are a perfect Autumn Quarted of sugary goodness! (Just don't try to eat them!) The colors used are Scandalous, Milk Chocolate, Swiss Chocolate and Halo- all which are from a wonderful company called My Beauty Addiction. Sherrie was kind enough to send me quite an array of free samples for me to try out, and come up with different looks with. All in all, I've been having a ball!!! Her colors- especially the metallic tones- blend effortlessly and go on like a dream. You certainly can apply the shadows without primer- but when trying to achieve looks with multiple colors, honestly you're better off using an eye primer of some sort. At the moment, I am currently using her handcrafted Shadow-Poxy Primer and I am without a doubt in love with it. The primer goes on smoothly, is virtually weightless, and really holds your shadows in place all day long!!


While it seems this video takes a long time to get this eye look- keep in mind that I'm also talking while showing how the shadows are applied. This means it takes longer for me to do my makeup- because I'm flappin my gums away at everyone LOL. This look, if just done yourself, will take no more than 10 minutes to complete. And I have the intro, and end to say hello and thanks for watching! Extra time of course! It does take a few minutes extra to apply the glitter to your eyes- but I'd say with the way it sparkles- it's well worth "GLITTA-FYING" the look- don't you agree?!


I think either way, this color combination is a winner for my fall wardrobe this year.


September 4, 2010

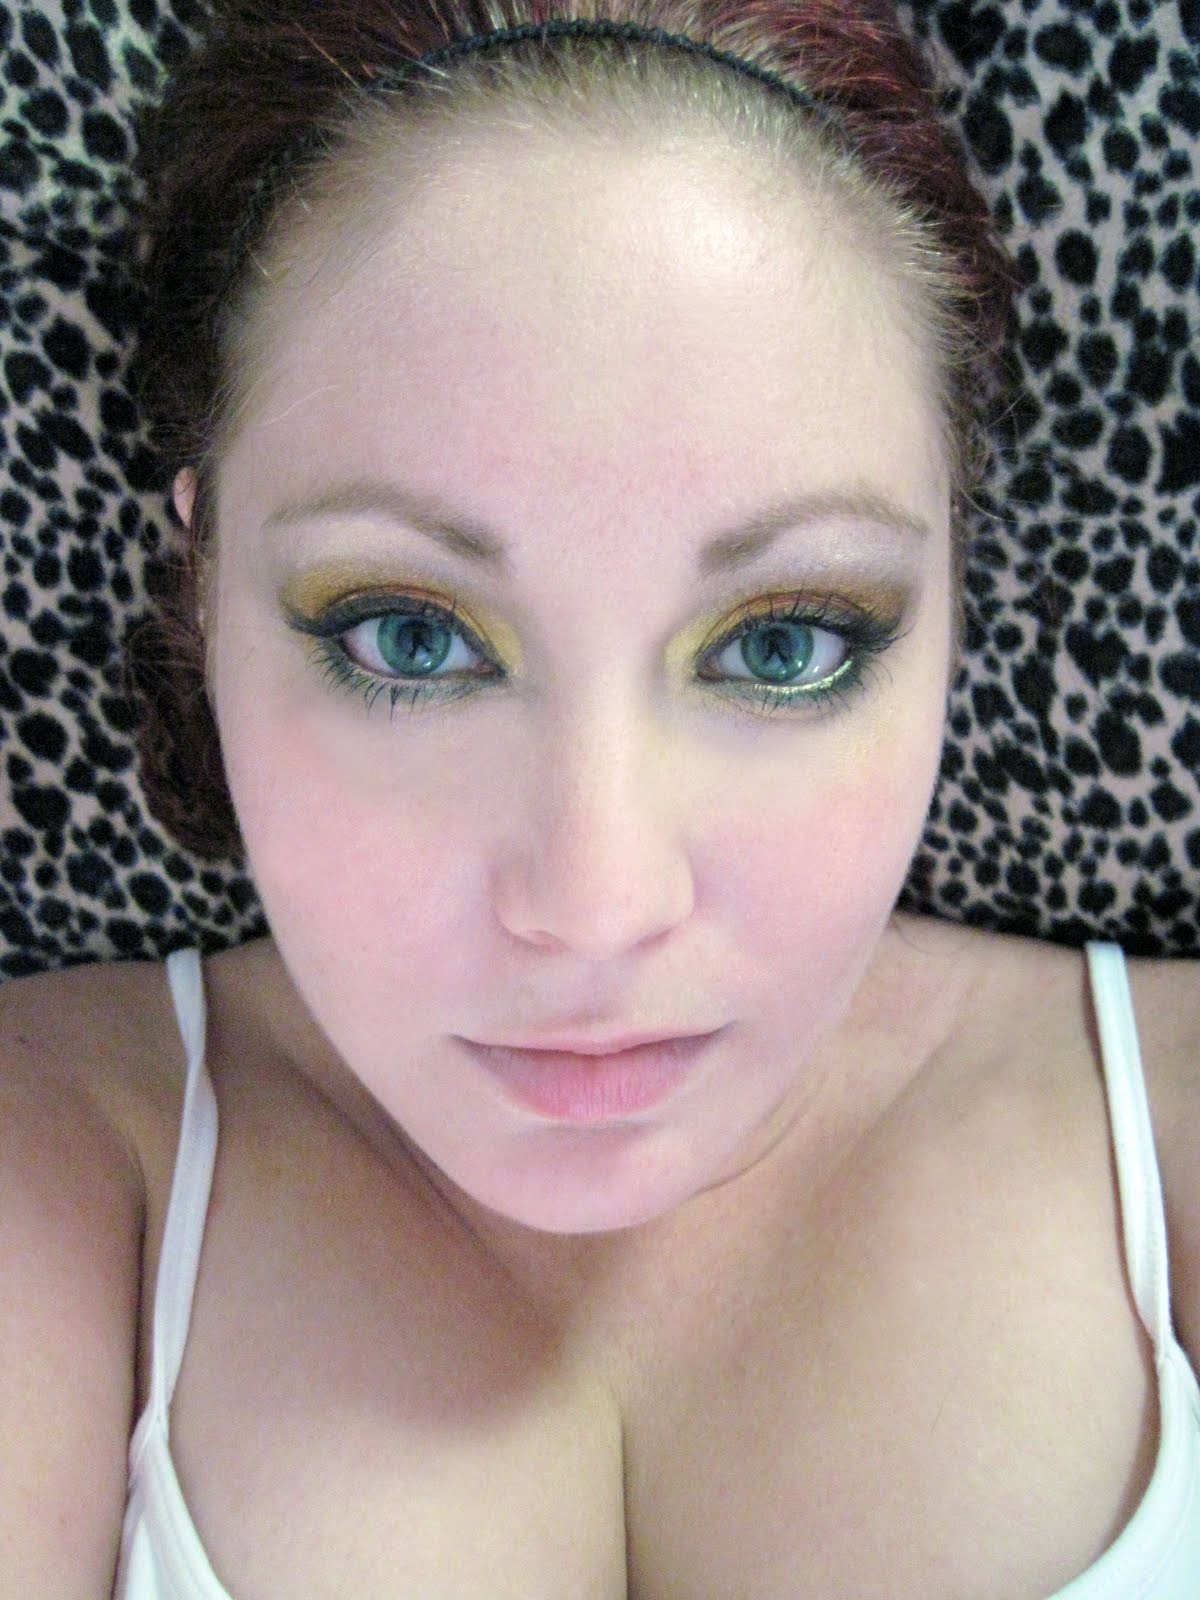
Peter, Peter Pumpkin Eater.... Yep, Leaf Peeper Eyes

Updated 03/05/2011 & 03/06/2011


This is strictly my own personal opinion about the matter. All material uncovered was done through a public google internet search with a few different keyword entries.

Due to information uncovered and revealed about this company, I cannot in good conscience or good faith recommend anyone support this reportedly handmade, organic small business. If information had been disclosed prior to discovery by the shop owner herself, I would have no problem with continuing to purchase. Regretfully, the scope of the lie and how many different people it could have potentially affected and hurt leaves me no other choice than to say this is not an honest company to do business with.

For information as to why, you can read more below:


http://the-eyes-have-it-all.blogspot.com/2011/03/this-way-that-way-which-way-whats-going.html
http://the-eyes-have-it-all.blogspot.com/2011/03/long-tale-of-orglamix-organic-ending.html


Or click here for more links and topics. The information can be found just below the introduction paragraph on the page.

**********************************************************


Wow, that all rhymed. I'm getting pretty good at this... Hah!

Anyways, while I wait for the video to upload to the eternal global network we call the interwebnetz, I figured I'd give you some pictures of the newest look that's I've created and some pictures to go along with it. Oh- and yes- a complete list of the cosmetics I used as well.


Now as most of you know, I have to do my foundation before I go on camera- simply because I don't want to horrify everyone by having the awful black and blue moons under my eyes scare everyone away. It's not that I don't get enough sleep- because there's plenty of that- it's just that I don't really feel rested. So- to spare you the gory visual of that walking nightmare of bags under my eyes- my face is prepped first. I actually cheat a little bit and use eye shadow primer under my eyes- then use my foundation as concealer... Since it stays surprisingly well! Once that's done, I brush the powdered mineral foundation all over my face- and call it good. I mentioned before I use Physicians Formula "Organic Wear", and since my tan has faded.... I'm back to my porcelain, fishbelly white skin again. Hooray.


(I kinda miss my tan... *sighs*)

After my face is done, I fill in my brows. Anything will do- and I simply use a matte brown mineral eyeshadow to fill them in. You can use any sort of powder or pressed color to fill them in, just make sure it's matte and doesn't have any shimmer. You really don't want glittery brows... Unless that's your thing- and if it is, well, cool!


When I hit the camera this time, I used cosmetics from a few different companies I've purchased from.

There are some colors I've used from Cheri of Orglamix in this video- the three used on my lid as colors being Citron, Mandarin and Champagne Toast. Citron is a vibrant, bright yellow that I had to have as soon as I saw it. Mandarin is a cute and juicy orange that's vibrant as well- and it's not one of those oranges you put on and go "Ew. Gross." This is Mandarin- with a soft shimmer! Last up is Champagne Toast, and it's a beautiful neutral color that's got a lot of wonderful shimmery flecks in it. I use it often either as a brow bone highlighter, or as my lid color. Citron and Mandarin were two colors I won as part of a giveaway, and Champagne Toast I had purchased. On my cheeks- Baie Rose. It was part of a separate collection purchase I had made, and even though it's technically an eye shadow- it works wonderfully on the face as a blush as it has a light rose color with a hint of iridescent gold. In the video, you can see that I have a cup of water which I dip my angled brush into. Then I hold up Midnight- a black powder shadow. By wetting the powder, it makes a liquid liner which is then applied to my eyes. Voila!


The beautiful brown color on my eyes is a color called Milk Chocolate, and comes from Sherrie over at My Beauty Addiction. I love this color since no matter how much you blend it down- the metallic never "muddies" or looks odd. Any of the colors made by her which are metallic do not muddy- so sign me up! A little goes a long way- as you will see in the video. She was also very kind to send me free samples to use in creating some of my looks- as you see now. The Shadow Poxy, aka eye primer, I used on my eyes before applying the makeup is also from her and a recent purchase I made. In my personal opinion, this formula works better than UDPP- which I have also used with success. For the pricing, quality and quantity of product though- MBA is the way to go for me from now on! And the lip treatment- well, you can reference that in my Gotta Have It: My Beauty Addiction: Lip Goodies Review post- one free gift, and the lip treatment a surprise one!


I also used an eye crayon which was a glittery, silvery white. I don't know the brand or color name- as the information has been worn off the crayon. My sister left it home... So it has found its way into my collection for occasional use. I used it as a highlighter on my eye to even out the tone, and it also helps the shadows stick a little better since it's slightly creamy once patted on. If I were to take a wild guess, it looks like one of the Cover Girl eye shadow pencils. Of course, we're not forgetting the N.Y.C. eyeliner- which I used to color my upper waterline. Make sure the pencil is smooth and glides on- you definitely don't want to be fighting a color when trying to get it to stay on your upper/lower waterline- use a kohl pencil if you must!

All in all, I think while dramatic- this look is a perfect combination of colors to usher in Autumn... Don't you think?!


I apologize for my awful looking hair. I honestly didn't want to fuss with it- so in a headband and loose ponytail it went. I know you can see my blonde roots- and for that I'm so sorry. I'm getting re-dyed this weekend- back to the insane red I so very much love!